
Wizard Outboard Motor Forum
Welcome to the new Wizard Outboard Forum.

http://store.oldmercs.com/product_p/396-648.htm
Spark plug wire is standard copper stranded core 7mm wire found on eBay and sold by the foot.
http://www.ebay.com/itm/Parts-Unlimited-Spark-Plug-Wire-7mm-Copper-Core-Stranded-Conductor-7MMCW-/380977553909?hash=item58b40821f5&vxp=mtr
You may have an OK coil now if there is no cracking on the insulation of it. Rotten wires can be clipped and new wires soldered on, or if core of wire is OK, use heat shrink tubing over cracked wire insulation.
other parts you may need (4 pages)
http://store.oldmercs.com/category_s/87.htm
I have a WD3 and I love it. Good little motor if taken care of.
I sure appreciate your help
 [/URL]
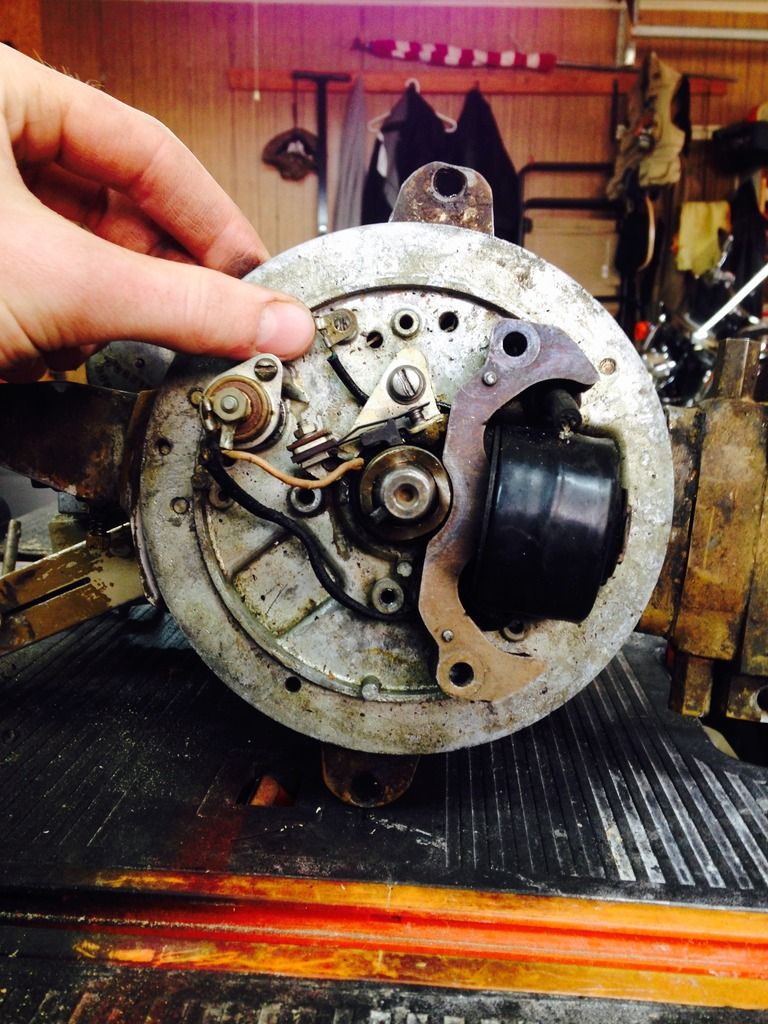
This is an image of the motor plate, there are two holes in the rubber coil ( is this a magneto or a coil starter). I will need new spark plug wire and the wiring coming from the coil is in bad shape,
I'm not sure how to know whether I need a new condenser or a new eisman pointer part. Now I'm pretty sure I will buy a new coil because of the small holes you see in this image... [/URL]
Now will be able to reuse the metal magets( I'm assuming they are magnets) that are inserted in the coil and how do I get it off properly?
From what I can see of rest of your WD3 it looks to need a major cleaning
which brings up question of condition...no sense putting new shoes on a dead
horse. A bad crankshaft or piston would be a game stopper as they are unique
to singles and hard to come by.
Coil might be checked out by small engine repair shop for a small fee.
Nothing saves money like not buying things not needed. Coil is a $50 bet.
At a meet a couple weeks back noticed someone had brought in a clean looking
magneto plate with a new coil. Curious that I am I asked about it and was told it was a NEW BAD coil. I did not ask if it was NOS or current
reproduction...at a large meet a few years back a vendor had a
large trailer loaded with New Old Stock from a Mercury dealer...including a large assortment of of Eisemann coils...not knowing their application I passed. Vendor had no idea of applications but prices were right.
Louis
I'm determined so I bought the parts needed, once I get it back together when the parts get in then I will send you an update
The black donut shaped part is the coil...the metal portion is called lamination
or core. Lamination/Core part is positioned so portion that faces out to inside
of flywheel is very close. This is so magnet embedded in rim of flywheel gives maximum effect in creating ignition spark.The coil may be held on by a clip
and tight fit. IF coil is junk I open up vise jaws enough to clear lamination
core and use a dowel and hammer to drive the lamination/core out of coil.
Some coil designs include lamination with replacement coil (Bendix Others?)
and some designs make the lamination/core as an integral part of magneto
plate (Phelon) It appears that Phelon machines the magneto plate with the
lamination/core installed to obtain close fit...no separate part number for
components only for assembly.
Not the most vital information perhaps but learned the hard way.
Louis
Good idea to mark lamination with permanent marker to show how it was
oriented just in case. Mr. Murpy's Law states that when there are two
ways to do something the odds favor the wrong way.
I'm not sure how the water pump is on the motor, I'm hesitant on taking the motor apart in fear of damaging the crank shaft or the cylinder
Strike the word FEAR from your vocabulary. Once you have that out of the way
you are ready for adventure. There is nothing you can break that can not be
replaced. The odds are that you will not do motor any harm. In any case the
magneto is toughie...the rest is take it apart, clean it up and put it back
together again.
Take a look at the Mercury K2 Parts in a Bin project pictures. No matter how
rough a project looks it can turn out well AND I got a free bin and cover
to boot.
Louis
Here's what I think Louis is talking about:
http://www.wizardoutboardforum.com/Howto.html
lower unit pics
http://www.wizardoutboardforum.com/LowPics.html
What has mixture do I need to use for the 1946 wd3; I've heard different things
Original ratio was 3/8 pint per gallon using lube oil available back then.
Current TCW-3 outboard oil is an improved purpose made product.Using the
original ratio is probably a little conservative but will do no harm.
Brands with an outboard makers name on label may be better than others.
Use the good stuff, use enough of it and move on to bigger questions.
Louis
I run 32:1 gas/oil ratio in mine with Penzoil TCW-3 or 2cycle oil and haven't had any problems. It seems I read that 2-cycle oil has better lubrication at hotter temperatures and may be better for the air cooled Wizards. 24:1 if you are worried. I wouldn't go any leaner than 32:1 and the more oil you put in, the more rainbows you get on the water behind the boat. Never use straight motor oil like they used to do back in the day.
The general instructions for the WD-4S motor found here work pretty well for the WD3 motor also.
Does the wd3 wizard 1946 even have a water pump? I read something about older motors being air cooled.
Check out the lower unit pictures on this site. All of the early K Models
has water pumps although of three different designs. Post war KD Mercury
and WD,WF and WG models have the third design.
There are air cooled outboards such as the prewar Bendix and postwar models
made by a number of makers and sold under various brands.
Louis
The short answer to nate's question is yes. Don't crank it out of water.
 [/URL]
I can't get the prop off I've done it a couple of days of go and it came out without a problem. The second time around I have taken out 4 screws but it won't come off.
Four Screws? Please explain.
Prop is held on prop shaft by the acorn nut on end of prop shaft.
Corrosion is not likely issue if you have removed prior.
Did you find a washer and rubber bushing under the acorn nut?
Often the washer has been replaced with a standard washer which
has too large a diameter which can be jammed into recess at rear of
propeller and cause a problem to remove. That may/may not be the issue.
To combat corrosion preventative maintenance called for grease to be
applied to prop shaft anytime prop or water pump was service or annually.
Seldom done if my experience is any indication.
Louis
I'm attempting to clean the water pump and I removed 4 screws around the prop area that are the pump/prop onto the lower unit of the outboard. There is a slight opening between the water pump and the lower when I remove the screws but it won't come out readily. Did I possibly reassemble the water pump/prop back on incorrectly by not lining something up correctly. If that's the case then I'm screwed. The crank shaft is still moving when the prop is moved which gives me hope that I didn't break it. The new coil came in today so I plan on a test run tommorow.
I put the new coil in today and the ohms meter is transferring electricity but there is no spark, what are some possible issues?
It would be helpful to see picture as I can't see what you are saying regarding
the water pump/gear case/prop shaft/prop difficulty. I have been called dense.
The brass plug in gear case is almost always fused to aluminum gear case by
corrosion. If stuck best to leave it be.
Louis